Every once in a while we face a task during our uphill blogging journey, which makes us want to pull our hair and scream. The process of transferring a website from one host to another is also one such crazy task. For anyone starting out in blogging, or someone who has no technical skills whatsoever how to transfer a WordPress blog to another host can be quite intimidating. Inspire2rise was earlier hosted on GoDaddy’s shared web hosting. Though the product was good with some minor adjustments when as part of ongoing Thanksgiving offers we got a chance for the Inmotion hosting pro package only for 10$, so I made the switch.
The process of transferring a blog from one account to another can be challenging for anyone, especially GoDaddy Web hosting users. This is because they don’t have Cpanel, but rather have their own custom admin dashboard. So, we will bring to you all the necessary steps and precautions to be taken while transferring your web hosting. Read this Inspire2rise guide and learn How to transfer a blog from one host to another today! Right now we are using VapourHost in 2024 and would strongly recommend their services to almost anyone looking for affordable cloud hosting.
Reading now - How to transfer blog from one host to another without downtime.
This whole process can be categorized into two categories. One for static websites with no database connectivity, and the other for dynamic websites with database connectivity.
Table of Contents
For Websites without DB connectivity :
Once you have bought your new web hosting package from your new provider, then the next step is to transfer all the website files ( content ) in its entirety to the new hosting provider.
After this is successfully done, you have to change your name servers in the domain name provider’s account to point to the new web hosting.
If you are using Cloudflare like many of us, then you have to change your A record to point to your new Server’s IP address, which is always visible on the left-hand side of Cpanel when you scroll down.
In the case of name servers, it may take a day or a half to propagate. After that, your website will be served from the new server. To check whether it’s rendering from the new server you can use the “ping website url” in the command prompt to check the IP address of the server serving your website. Or you can use the Trace Route available at tools.pingdom.com which will tell you the serving IP address of your website.
NOTE: Never ever cancel your previous web hosting package till you have successfully moved your site and ensured that everything is working correctly.
Reading now - How to transfer blog from one host to another without downtime.
How to transfer blog from one host to another: For websites with database connectivity.
Buy a new hosting account preferably from some company with fast hosting services. The first step before transferring your website is to take backups of the current setup in it’s entirety. Taking a backup is very easy for those on Cpanel-powered web hosting packages.
To do so do this :
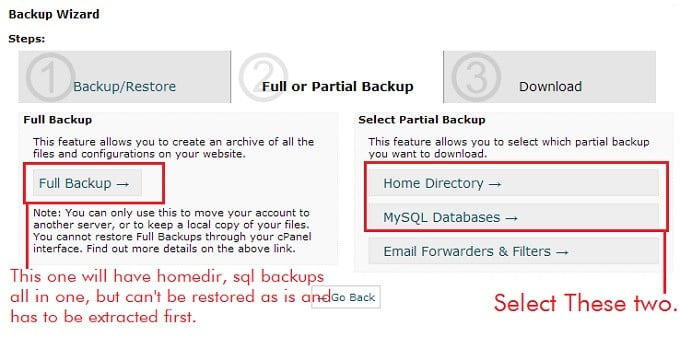
- Log in to your Cpanel, and click on the “Backup” icon. In the section where it says Home Directory Backup, click on that and do the same for MySQL backup. Once you generate those backups they will be either downloaded directly or will be present in a backups folder on your server which you can access via the file manager. They will be present in tar.gz format and the sql backup will be in sql.gz format.

How to transfer blog from one host to another without downtime: Select different backups to ensure correctness. - Now once you have your backup, open your new hosting account. In the file manager upload the home directory backup and extract it there. Alternatively, you can also restore the Home Directory via the “Restore” option in the Backups option. The first option is recommended for those people who want full control over the backup process and are purists like me. The second option is recommended for 90% of the rest of the people.
- Restoring the database is an easy process if you select the second option above, this is because you would just need to select the “Restore MySQL Backup” option above which would lead to automatically configuring of database in most cases.
But as purists like me would say, this is not the best or foolproof method to get this done. - The Fool-Proof method for zero Database connectivity issues is given below :
Go to MySQL in your Cpanel.
Click on “Create new Database”, and give it an apt name.
Now once this is done, click on “Create new User”, and give a nice name to this one too.
Note down the Database name, MySQL username, and password somewhere.
Now click on “Add User to Database”, and add the user you just made to the Database that you had just made.
In the options where you have to select user privileges, select all privileges to allow this MySQL user full access to everything.
Now that this empty Database is present with a user that can access it, then let’s restore the sql.gz backup of our site into it.
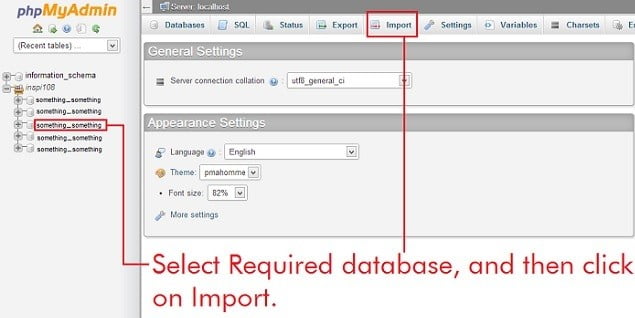
To do this, go to “PhpMyAdmin” in the Cpanel. Select your database from the drop-down on the left. Once it’s done. Click on “Import”, now select the backup file you want to restore.
Now once this is done. This database contains the information on your site. Now just let us plug in this with the files present on your server.
How to transfer blog from one host to another without downtime : PhpMyAdmin is locked in some hosts. Contact your hosting provider for passwords and usernames in such a case.
Reading now - How to transfer blog from one host to another without downtime.
If you are running WordPress then the next few paragraphs are going to be very important for you.
- Go to “File Manager”, and tick “Show all Files”, once inside the public_html folder select “wp-config.php”.
Find the MySQL Database name in the wp-config, and change it with the name of the database you just created. Similarly, change the MySQL username and password there. Example in below code.define('DB_NAME', 'user_wrdp1'); /** MySQL database username */ define('DB_USER', 'user_wrdp1'); /** MySQL database password */ define('DB_PASSWORD', 'password'); - Now look carefully, there is a field in wp-config.php that states where the database is hosted. For 99% of users, this should be set to “localhost”. For those who are on servers that host databases on custom URLs such as 000webhost or GoDaddy, they have to specify the exact URL of the DB server. For example, for 000webhost it is something like mysql001.000webhost.com, and the URLs may be different depending upon a few hosts. But in most of the cases “localhost” would do just fine.
- Once the wp-config part is done, no DB connectivity issues should happen. But in many cases, errors can still arise. So we are making a list of common errors that happen with WordPress users.
- After you complete all of the steps above you have to either change your name servers or change the A-Record in your domain name provider console.
Nameservers look like :NS1.PREVIOUSWEBHOST.COM NS2.PREVIOUSWEBHOST.COM
A – records look like a simple IP address which is the IP address of the server your website is hosted on.
Reading now - How to transfer blog from one host to another without downtime.
How to transfer a blog from one host to another without downtime: Common Errors.
- Posts pages are returning a “404 not found error”: This issue is related to .htaccess and caching plugins.
Check in your wp-config.php and htaccess whether any of your cache plugins like W3 Total Cache or Wp Super cache has added any line which states the path of the plugin or its drop-ins.
Exp: /account/a56482/public_html/wp-content/advanced-cache.php
Now all that you have to do is change the above URL string so that it points to the location of the above file in your current hosting account.
The best method to tackle this issue is to just delete the Cache plugin before taking any backup, and after you are done moving on to the new server then install your favorite cache plugin there.
Sometimes the posts not being accessible issue is something to do with pretty permalinks, just go to the permalinks inside the WordPress dashboard and save the permalink structure again, and check. - Database connectivity issues – 500 Internal server error: This is caused only because of your wp-config file not set up properly. You can easily remove this error by ensuring that you put the correct database name, username, password, and database host field in the wp-config.php.
Sometimes the .htaccess files cause a lot of errors, at that time simply make a default .htaccess file using Notepad and upload it to the home directory.
The code for the default .htaccess file is as below :# BEGIN WordPress <IfModule mod_rewrite.c> RewriteEngine On RewriteBase / RewriteCond %{REQUEST_FILENAME} !-f RewriteCond %{REQUEST_FILENAME} !-d RewriteRule . /index.php [L] </IfModule> # END WordPress - Issues with accounts having more than one domain or adding a new website to a hosting account with existing domains: When you are moving your site to an account that already has more than one website, then first step would be to go to “AddOn Domains”. Add the domain that you want to move to that server, the cpanel will automatically create a path called public_html/yourdomainname . You have to move the backup of your site here. Other steps are the same as before. The Cpanel would also create a subdomain called yourdomainname.rootdomainname.com which would be just a representative of the domain adding changes. Nothing important to worry about! 😀
Reading now - How to transfer blog from one host to another without downtime.
Tips to ensure smooth moving of website.
Always flush your caches in a new browser while logging in to your website after changing your web host. This is because of the old DNS cache which could lead you to logging into the older host’s files.
Always ensure that your site is moved perfectly before you start making any changes. Until and unless you are sure that your website is completely moved don’t cancel your previous hosting account or make any new changes to your website.
If you have any problems regarding how to move your website or the like then don’t hesitate to contact me via the comments below. I will be more than happy to help.
Stay Inspired to rise!

Follow Inspire2rise on Twitter. | Follow Inspire2rise on Facebook. | Follow Inspire2rise on Google+.


