While you may have never considered creating a split-screen video of your own because of how complicated it appears, it really isn’t all that difficult with the help of Movavi Video Editor. Frankly speaking all it will take is a few minutes, and you should be able to create your first split screen video.
Naturally the first thing you will need to do is add the videos that you wish to edit into Movavi Video Editor. To do that just launch the software and select ‘Create project in full feature mode’ then click ‘Add Media Files’. Keep in mind that to create a split-screen video you’ll require at least two videos, and both should be added to the editor.
After the videos are added, both will appear in Movavi Video Editor’s ‘Timeline’ that is located in the lower part of the interface. By default they’ll be in the ‘Video’ track but to create a split-screen video you’ll have to click and drag one of the videos upwards to the ‘Overlay’ track instead.
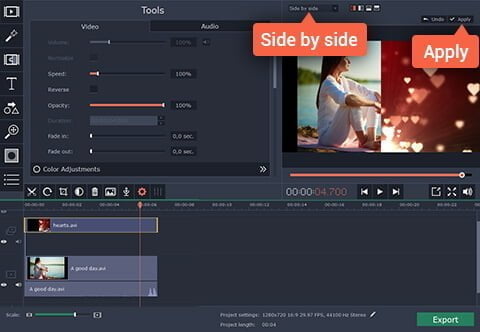
To implement the split-screen effect, double-click the video in the ‘Overlay’ track. Above the ‘Preview’ window on the right you should see a list that you can expand then select ‘Side by side’. Once you do, a set of 4 buttons will appear beside the list that you can use to choose where the video from the ‘Video’ track will play (and the video in the ‘Overlay’ track will be played in the other section).

Assuming you’re satisfied with how the split-screen is set up, click ‘Apply’ to finalize it. The only problem at this point will be that if you were to play your video the audio from both videos will play simultaneous. Fortunately it is easy enough to use Movavi Video Editor to fix that, and you can either mute one of the tracks by clicking on the ‘Mute’ icon, or mute both then add a new audio track.
That is really all that needs to be done, though you could also use Movavi Video Editor to cut and join video segments, apply special effects, enhance the video quality, insert animated transitions, and much more. Whenever you’re satisfied you can then save your video, and may want to take advantage of the built-in presets to help you automatically optimize it for various devices and platforms when you do.
As you can see Movavi Video Editor is designed in such a way that even more advanced video editing tasks are easy and straightforward. If you take your time and explore its features, you’ll soon find that you’re able to truly edit your video in any way you see fit.
Do you have something to add to this? Then don’t forget to leave a comment below!
Keep visiting for more such awesome posts, internet tips, lifestyle tips, and remember we cover,
“Everything under the Sun!”
Follow Inspire2rise on Twitter. | Follow Inspire2rise on Facebook. | Follow Inspire2rise on YouTube.


