


There are many performance optimization plugins for WordPress like WP-Rocket, WP-Super cache, Hyper Cache, DB-Cache Reloaded Fix, etc. But we will discuss only the W3 Total cache in detail as it has the deepest possibility of customization. So we will give you W3 Total Cache settings which are the best and optimized for almost all different server setups.
Because of many Google updates like Penguin, Panda & Fred, and now May update, the loading time of websites plays a critical role in a website’s search engine rankings. There are several ways to speed up a website. Caching, database caching, object caching, lazy loading, minifying, and a lot more. Optimizing images and a lot more other factors are required to make sure that your sites load fast, really fast.
The real beauty of the W3 Total Cache plugin is that it makes it easy to do it all in one place.
So, let’s start the tutorial without wasting much time! 😀
Table of Contents
W3 Total Cache settings 2024 edition:

1.) First of all, install W3 Total Cache plugin for WordPress and activate it.
2.) Now after activation deactivate the Preview mode. To deactivate it, just click “Performance” on the left side of your WordPress dashboard and click the “Disable” button on the Preview section.
Now we will do the rest of the process stepwise.
General Settings
- Enable Page Cache, use “Disk: Enhanced”. If it’s showing up in your options then you can also select Opcode: APCu or Redis as it’s the fastest. But in most cases, the Disk Enhanced method is the fastest as it creates static HTML files out of your dynamic page. If you choose Redis or Memcached then you also can run into troubles with low RAM.
- Enable Minify, and set it to “manual”. Use “Disk”. If it’s showing up then you can also select Redis > Memcached> APCu as it’s the best in the mentioned order.
- Enable Database Caching. Use: “Disk”. If your wp-config is not writable due to some security plugin then set it to writable for the optimal working of Database Cache.
Note: If you use Disk in Database caching it will be slower than actually running your MySQL engine in most cases and hence we would recommend keeping it off unless you can run Database cache using APCu, Memcached, or Redis. Memcached will be the fastest but in most cases, Redis will suffice. You might need to enable the APCu, Memcached, or Redis PHP extensions on your hosting end. - Enable Object Caching. Use: “Disk”. It’s great for sites with heavy traffic. But if possible running Object caching via APCu, Memcached, or Redis is what will give you the most gains.
- Enable Fragment Caching: Just like Object caching, Fragment Caching is an extension of it and can benefit from being run on APCu, Memcached, or Redis. If those options are not available then you can use disk, unlike Database caching which will not impact your performance.
Note: In order to use Fragment Cache you need to buy the paid version of W3 Total Cache. - Enable Opcode Caching: Set it to Zend OpCode Cache as it caches the output of your PHP requests and significantly speeds up PHP.
- Enable Browser Cache. It helps in leveraging browser caching.
- Enable Verify to rewrite rules, and if you have a Google Page speed API, then it’s your choice to enable the Dashboard Widget.
- Enable Cloudflare connection.
- Enable Lazy Load images: We have found that the Lazy Load offered by W3 Total Cache works best with third-party plugins like EWWW optimizer and if you are using such a solution to serve WebP images then this will come in handy.
Optionally you can enable “Optimize disk enhanced page and minify disk caching for NFS“. It helps on some shared hosting setups.
Optionally you can also disable the JQuery migrate script on the front end as most modern themes don’t use it. You can also remove emoji support from your site if it’s not critical to your site functionality.
Note: APCu has been deprecated by most newer hosts but if you are running a single site setup then it’s better than not running any advanced caching method in the first place.
Redis is one of the best methods as it doesn’t require you to have tons of RAM.
Memcached might work the fastest but it benefits from having a high amount of RAM which everyone might not have access to.
Advanced settings
W3 Total Cache settings For Page Cache
- Enable Cache front page.
- Enable Cache feeds site, categories, tags, and comments.
- Enable Cache SSL (HTTPS) requests.
- Enable Cache requests only for the www.yoursitename.com hostname.
- Enable Don’t cache pages for logged-in users.
For Cache Preload
- Enable Automatically prime the page cache. Set the update interval as 907 seconds or something close. Select the number of pages as 15 (increase or decrease depending on hosting).
- Enter your sitemap URL. And enable Prime to post cache on publishing.
For Advanced
- Set the Maximum lifetime of cache objects: 180060 seconds.
- Set Garbage collection interval: 3600 seconds.
W3 Total cache settings for Browser cache
- Enable set Last-Modified header, set expires header, set cache-control header, set W3 Total Cache header, and enable HTTP (gzip) compression. If your server supports Brotli then tick that as well in order to get maximum compression levels.
- Set all the cache control policies to Cache with Max-age.
For CSS & JS
- Set expires header lifetime: 31536000 seconds (over 1 year).
- Enable set Last-Modified header, set expires header, set cache-control header, set W3 Total Cache header, and enable HTTP (gzip) compression.
For HTML & XML
- Set expires header lifetime: 7200 seconds.
- Enable set Last-Modified header, set expires header, set cache-control header, set W3 Total Cache header, and enable HTTP (gzip) compression.
For Media and other files
- Set expires header lifetime: 31536000 seconds.
- Enable set Last-Modified header, set expires header, set cache-control header, set W3 Total Cache header, and enable HTTP (gzip) compression.
W3 Total Cache settings for Minify.
- Enable rewrite URL structure and disable minify for logged-in users. Set error notification to Admin notification.
For HTML & XML
- Tick on enabling, inline CSS minification, inline JS modification, and line break removal.
For CSS
- Tick Enable, preserved comment removal, and line break removal. Now go to your website in some other browser and right click and view source. Find the CSS files, and add their URLs one by one in the CSS minification box. Do this to see whether something breaks the layout on minification or not.
For Advanced
- Update external files every: 216000 seconds and the same for garbage collection.
For JS
This is the most difficult part of setting up W3 total cache settings. It requires some trial and error. Do it if the above steps are not enough.
- Tick on enable preserved comment removal and line break removal. Now get to the source of your site as before and find only those js files that are hosted on your website. Now add their URLs one by one and check every time whether something is breaking your site or not.
- NOTE: Customscript.js and the themes js files like themename.js should not be minified as mostly they are the ones that cause errors.
W3 Total Cache settings for User-agent groups.
Just enable it and don’t change anything.
NOTE: If any setting is not there in this guide then leave it to the default value.
Checking the cache
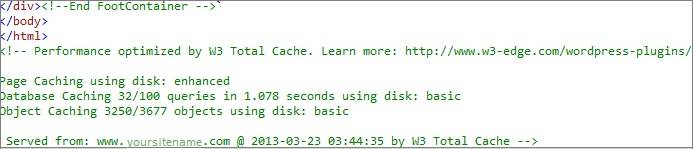
1.) Open any other browser clear its cache and then open your homepage URL. Now right-click and click on “View Page Source” and at the bottom, it should look like the screenshot below

2.) Go to tools.Pingdom and check your site load time. If everything is working well. You can expect results like the one below.


Troubleshooting
If the Optimal Settings do not work for you. Follow these steps :
1.) You can try the WP Fastest cache. And learn to customize it here. Using it along with any object cache plugin will give you nice results. But not better.
2.) Disable Gzip compression and see if it works well.
3.) You can comment below so that I can help you in fixing errors.
If you have any problem with the above guide or have any doubts, then do comment. I will be more than happy to help. 😀
Genuine views are also welcome.
Updated settings for different scenarios and custom W3 Total Cache configurations:
- For people on shared hosting servers: Enable only Page caching, browser caching, and Object caching for best results. Use the “Disk enhanced” method for best speeds. In Object caching set the time to 301 seconds or something around 5 minutes. If your shared hosting is too poor or you are using a free server then only use the browser caching module with the page caching module as it makes the objects static instead of dynamic PHP code execution on every page hit.
- Try and use Cloudflare CDN
or Pagespeed CDNalong with the W3 Total Cache plugin in order to have the best loading time. (NOTE: Google PageSpeed CDN has been officially retired by them quite some time ago.)
By adjusting Cloudflare’s best settings, adjust complicated things like performance, security, and page rules for defining what you want to be cached and what not. For people who run into any problems, they can always comment here or they can share their problems on the Cloudflare forum here.
- Try and optimize cron jobs manually to reduce server usage and you can also try to disable the WordPress heartbeat API in order to reduce CPU usage. Disabling automatic cron can go a long way in improving the overall performance of your server and saving you unnecessary load.
- W3 Total Cache miscellaneous settings: Enabling the “Edge mode” in the latest variant of W3 Total Cache can give a minor speed boost to some server setups. But be warned as it’s known to break some server configurations, so always try it at your own risk.
- W3 Total Cache extensions: The W3 Total cache plugin now comes with extensions in order to improve upon the existing functionality. Those people using the WordPress SEO by Yoast plugin can enable the Yoast SEO extension. Those people looking to implement Cloudflare on their sites need to install the Cloudflare extension for communication between Cloudflare and the caching plugin.
Installing the Feedburner extension allows you to ping Feedburner automatically every time you publish a new post. There’s also the extension for Genesis Framework, but it requires W3 Total Cache Pro along with Genesis Framework installed on the site. This module improves the page generation time by 30%-60% for the Genesis Framework by implementing the Fragment caching method which is available with W3 Total Cache Pro.
You may like: Spotify Premium APK Download
Conclusion
There are a lot of other easy options in the market that don’t involve as many features as the W3 Total cache plugin. In recent times the W3 Total Cache plugin has also undergone many changes. A lot of advanced features are only available for the paid pro versions.
But in this w3 total cache settings guide 2024 we have only covered those things that you can configure for free. Those interested in getting their sites manually tweaked for best performance or those who want help in configuring w3 total cache settings can leave their queries in the comments below and contact us via email for the speed packages.
Otherwise following this guide well and having a good server can easily get you around the 1-2 seconds loading time mark.
Last Updated on 22nd January 2024.
Stay inspired to rise.
Inspire2rise on Facebook | Inspire2rise on twitter
All rights reserved. 2011-24 ©Inspire2rise.com


