

WordPress is the standard choice for online content management systems. People who are familiar with CPanel software and Apache servers know how easy it is to install WordPress using either 1Click Installer or manually (requires a bit more time and effort). WordPress is by default a fairly optimized PHP-based CMS. But still with time and new additions some of the features of WordPress can be very CPU intensive, especially for shared hosting servers or for those people who are using free servers. One of these new features is the WordPress heartbeat. The heartbeat is essentially a background script that keeps running and is an integral part of WordPress’ functionality. Let’s learn more about it and learn how to disable WordPress heartbeat API to reduce CPU usage.
Table of Contents
What is WordPress heartbeat API?
The name Heartbeat comes from the fact that similar to a beating heart which generates a pulse the Heartbeat API also generates a pulse i.e. a tick which is associated with different actions that are performed periodically.
Heartbeat API is JavaScript-based and it allows WordPress to have cross-communication between the server and browser. It was initially introduced in WordPress 3.6, it helps in post-revision tracking, auto-saving of posts while writing (that handy auto draft feature), and user session management.
How does the Heartbeat API work?
The script /wp-admin/admin-ajax.php is used by the WordPress heartbeat API to run AJAX calls. This is very useful as it helps WordPress to keep track of everything being done on the dashboard. But the dark side is that it keeps sending requests even when the page might not be in use.
Where does the problem start?
The problem starts when the Heartbeat API starts calling the admin-ajax.php file frequently, this can lead to high CPU usage.
Even when someone has only logged into the WordPress admin dashboard and is working on other tabs or they have minimized the active window then also the admin-ajax.php file is requested repeatedly after a fixed interval of time.
The number of script executions even when doing nothing is quite high and can lead to CPU resource over-usage or further problems. A simple solution to this problem is to disable or selectively disable the WordPress heartbeat API.
How to disable WordPress heartbeat API to reduce CPU usage: The method.
To disable the Heartbeat API you have to locate the functions.php file of your active theme first.
To do so follow these steps :
- After logging into the WordPress dashboard go to Appearance > Editor from the menu on the left-hand side.
- Now locate the functions.php file from the list of files on the right-hand side.
- The path to the file may look like this: /home/username/public_html/wp-content/themes/currently_active_theme/functions.php
- Make a local backup of this file in case anything goes wrong and you may need to revert to previous stable code.
- Click on it to start editing it.
Now that you have functions.php and it’s ready for editing let’s see the possible courses of action :
NOTE: You can either completely disable WordPress Heartbeat API or you can choose to selectively disable it.
Steps to disable WordPress Heartbeat API completely :
Add the following code at the beginning of functions.php just after the <?php tag (opening php tag).
*/
add_action( 'init', 'stop_heartbeat', 1 );
function stop_heartbeat() {
 wp_deregister_script('heartbeat');
}
/**
The above code disables heartbeat sitewide and many of the functions of WordPress that were normally available would not work when this code has been added. But this one promises the most reduced CPU usage.
Currently, we also use this code, and every time we are done writing a post we remove it for some time just to change the post URL before publishing and editing the tags. (These functions don’t work when Heartbeat API is disabled.)
One more method to add this code to your Functions.php can be via using a Third Party Plugin called Code Snippets.
- Go to A
Steps to disable WordPress Heartbeat only on the Dashboard page (index.php) :
We make use of the global WordPress $pagenow variable to determine which page user is currently at. We can make use of a conditional if statement to define the pages on which the WordPress Heartbeat API should be enabled.
add_action( 'init', 'stop_heartbeat', 1 );
function stop_heartbeat() {
global $pagenow;
if ( $pagenow == 'index.php' )
wp_deregister_script('heartbeat');
}
The above code disabled the heartbeat only on the WordPress dashboard page. (It would only make a moderate difference in CPU usage.)
Steps to keep WordPress Heartbeat only on post.php and post_new.php pages :
By selectively using if statements we can keep the Heartbeat alive on post.php and post_new.php pages where they are needed the most. ( This option will be most beneficial for most of the users.)
add_action( 'init', 'stop_heartbeat', 1 );
function stop_heartbeat() {
global $pagenow;
if ( $pagenow != 'post.php' && $pagenow != 'post-new.php' )
wp_deregister_script('heartbeat');
}
By adding the above code in the functions.php the Heartbeat API would be disabled everywhere except the post.php and the post_new.php pages. This is the most hassle-free option where you won’t need to re-enable and disable it once you are done. However, the resource usage will still be significant.
*We can tell this by experience as most of the time we left add new post pages open and went on to do other work, this resulted in frequent calls and CPU usage spikes.
NOTE: In order to maximize the efficiency of the above variant of enabling Heartbeat we would recommend you to stay logged in only when doing something significant. If you aren’t using WordPress then it would be a better choice to log out and focus on other work.
So, this was our How to disable WordPress heartbeat API to reduce CPU usage guide, did you like it? If yes, then do comment below.
Disable WordPress HeartBeat API Using a Plugin
For those of you who are not really Code Savvy and don’t wish to edit your functions.php or mess with Code Snippets plugin then you can have a dedicated plugin to play with the WordPress HeartBeat API.
Step 1: Set up the Heartbeat Control plugin
- Access your WordPress administrative dashboard.
- Head to the plugins tab from the dashboard.
- Enter “heartbeat control” into the search bar and click the “Install Now” button.

Step 2: Customize the heartbeat settings
- Go to the “Settings” section of your WordPress admin panel.
- Select “Heartbeat Control Settings” from the list.
- Choose “Modify Heartbeat” from the dropdown menu.
Note: You can either enable, disable, or modify the heartbeat behavior from this menu.
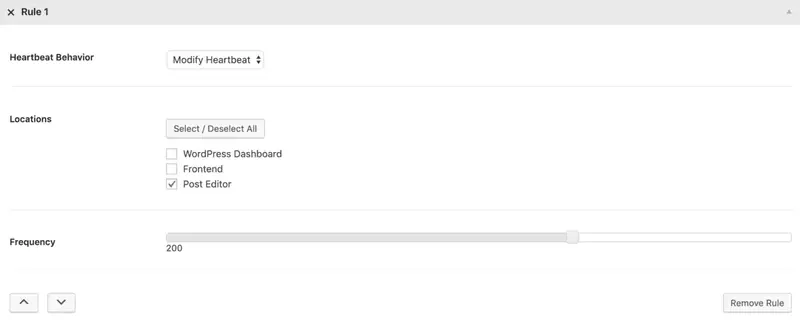
- Specify the locations where you want the heartbeat to run.
- Set the frequency of the heartbeat pings to your server.
- We advise using an interval of 200 seconds or longer for optimal performance. A shorter interval may impact site speed.
- Once finished, click the “Save Changes” button.
Using the Heartbeat Control plugin, you can dictate how frequently the Heartbeat API sends callbacks to your server.
After installing and activating the plugin, navigate to Settings > Heartbeat Control Settings.
Here, you can establish a specific rule for the API.
- Heartbeat Behavior – Select one of the following options: Enable Heartbeat, Disable Heartbeat, or Modify Heartbeat.
- Locations – Choose which area you want to control the API from. You have three options: WordPress Dashboard, Frontend, and Post Editor
- Frequency – Specify the number of callbacks allowed for each chosen location. The range is between 15 and 300 seconds.
For instance, we limited the frequency of the Heartbeat API function in Post Editor to 200 seconds. This approach works better when multiple authors work together on the same WordPress site.
Additionally, you can set different values for each location you desire to control.
Simply click the “Add Another Value” button and adjust it as needed.
By utilizing this plugin, you also have the option to entirely disable the WordPress Heartbeat API.
To achieve this, choose “Disable Heartbeat” under the Heartbeat Behavior selection.
If you run into some problems while using these codes then do comment below, At Inspire2rise help will always be given to those who ask for it! 🙂
For more awesome blogging posts, keep visiting Inspire2rise.com.
Stay Inspired to rise!


Follow Inspire2rise on Twitter. | Follow Inspire2rise on Facebook. | Follow Inspire2rise on Google+.
Read more :
- How to install Genesis framework on a WordPress site
- How to make money online
- How to transfer a blog from one host to another without downtime
- How to increase referral traffic
- How to stay productive at work
- How to Show Hidden Files on a Mac

Thanks for this valuable post. Have implelented it one of our clients busy e-commerce site where performance is important.
Yeah Alastair, it’s actually a really important and useful piece of code for optimizing your WordPress!